Dithering About Dither In Which Some Noise Is Made
TL;DR
Dither can be helpful to make a thing appear more accurate than it really is.
Defining Dither
Dither is an interesting, and dead simple, technique which can help improve the perception of a signal - simply add noise! This can be used in audio, video, electronics, mechanical engineering and even high frequency trading!
When you see it in action it’s really quite intuitive how it works. Here’s the same picture of me processed in three different ways:

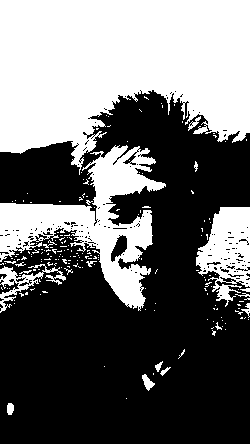
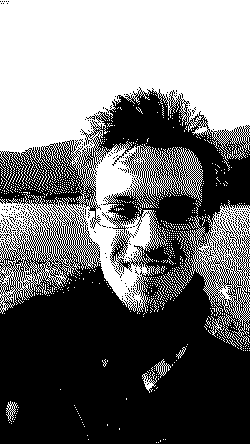
On the left is the original, a full colour image. In the middle is a rather awful image generated by simply clamping every pixel to either black or white. Finally on the right is another image which is also purely monochrome, however some of the pixels have been moved around.
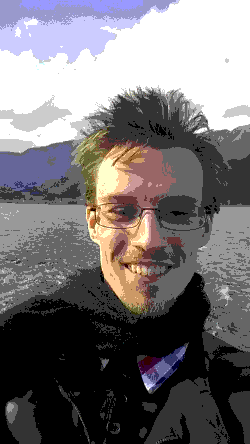
This works with colour images too. Here’s the same photo again with a limited colour palette, causing terrible banding, and exactly the same colour palette on the right but some of the pixels have been moved around. The image on the right is almost perfect at first glance despite using such an extremely limited colour palette.

What’s happening here is that the quantization error is being diffused.
Quantization error is the error which comes from representing an infinitely variable signal, as usually found in nature, to a signal with a limited resolution, as usually found in computers. For example there are an infinite number of colours in the real world but my camera only captures 16,777,216 million distinct colours, so even the full colour image above isn’t completely accurate!
Diffusing error simply means to spread it out. There are the same number of black pixels in both of the monochrome images above, however the dithered images appear better because the error is spread out.
Anywhere that you suffer from limited precision dither can help you out - image processing, audio rendering, sensor measurements, precision timing just to name a few. In all these cases dither spreads out errors, reducing the impact from one very big error to many small errors. The applications I’m particularly interested in are for realtime rendering for games. For example if colours are only stored with a low precision they will suffer from banding, dithering the colours will reduce the banding (as shown above). In fact even if you have an absolutely perfect representation of the colours you can still benefit from dither because you have to display to an imperfect monitor which will introduce banding - dithering the image before displaying it will reduce this.
The example images above were generated using an algorithm called Floyd-Steinberg Dithering. This is a fairly complex algorithm which is not suitable for realtime rendering. Instead I’m going to go into the details of noise based dithering, which can be used in realtime rendering.
Noise Dither
Before diving into how noise based dither works I’m going to show some dead simple example code. Fundamentally all pixel shaders come down to something like this:
float4 PixelShader(float2 screen_coordinate)
{
  return CalculateColour(screen_coordinate);
}
There are several ways we could dither this, depending on what we’re trying to achieve. For example let’s say we want to output to be monochrome. The naive way to do this is simply to convert it to grayscale and threshold the value to black or white:
bool PixelShader(float2 screen_coordinate)
{
    float4 col = CalculateColour(screen_coordinate);
    float gray = dot(col.rgb, float3(0.3, 0.59, 0.11)); //Magic conversion to grayscale
    return gray > 0.5;
}
This will look terrible, like the second example image above. Instead of that threshold against 0.5 we could do this:
return gray > random_in_range(0.4, 0.5);
Now there will be a softer edge to the black/white border.
An important aspect of dither is that if you’re dithering multiple things random values must be independent. Don’t re-use the same random value twice. For example if you want to add two textures together, you’d dither it like so:
float4 Add_PixelShader(float2 screen_coordinate)
{
  float4 tex1 = SampleTexture(Texture1, screen_coordinate + random_float2());
  float4 tex2 = SampleTexture(Texture2, screen_coordinate + random_float2());
  return tex1 + tex2;
}
The texture coordinates sampled from each texture are dithered slightly, using a different random value for each texture.
The really important thing in the above examples is exactly what kinda of randomness is in use. The type of noise has a large impact upon the quality of the dither.
The Shape Of Noise
When you think of random numbers you probably think of something like a dice roll; something where every value is equally likely i.e. it has a uniform distribution. However not all randomness is like this, you can get random numbers distributed in almost any way you imagine!
A probability density function (PDF) is a way to express how random numbers of distributed. It’s simply a function which returns the probability for a random number being equal to the given value. For a dice it’s pretty simple:
PDF_Dice(value) => 1 / 6
Of course every value on a dice is equally likely, so it’s just a constant one over six. If you were to roll a lot of dice, count up how often each number occurred, then graph the result the shape would be the same as graphing the probability density function.
For dither you probably want your noise not to be uniform. Something like a normal distribution (a.k.a bell curve) is more useful as it will distribute most of the samples over a small area and will fall off smoothly. There’s no hard cutoff to the dither which would introduce more visual artifacts.
Rapidly generating something approximating a normal distribution is surprisingly simple. The Irwin-Hall distribution is approximately the same shape and is generated by simply adding together uniform random values!
Here’s what 100 values of rand(), rand()+rand() and rand()+rand()+rand() look like when graphed on a histogram:
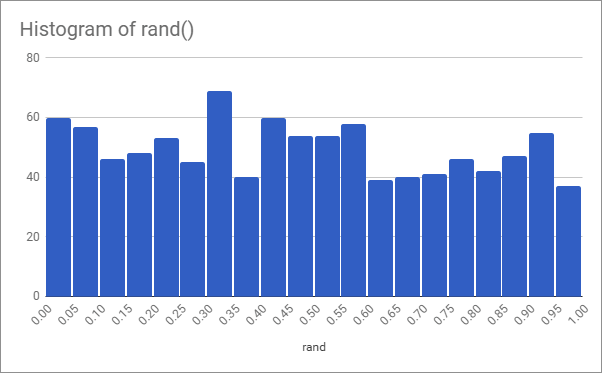
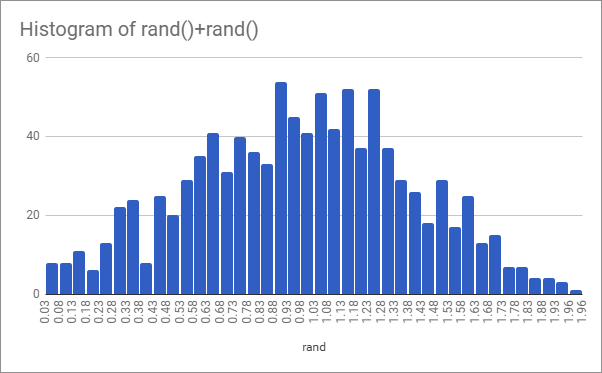
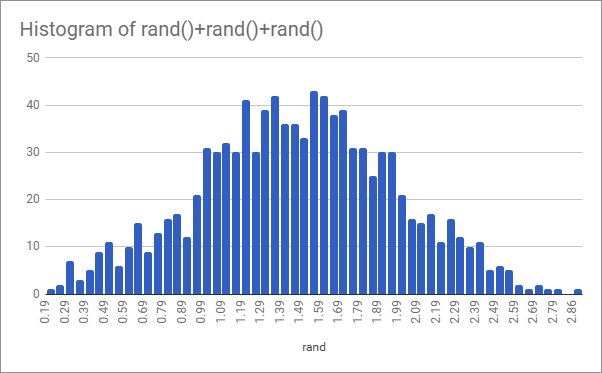
As you can see it’s approaching a bell curve shape even with just three values.
All you need now is to generate some noise and add it together. I’ve talked before about generating noise on the GPU. However the noise I generate in that blog post is (approximately) white noise, which probably isn’t what you want to use for dithering.
The Colour Of Noise
The distribution of the noise isn’t the only aspect to consider, the “colour” of the noise is also important. The shape (distribution) of the noise relates to the likelihood of getting certain numbers, conversely the colour relates to how those values are distributed in a sequence. Here are two random sequences of dice rolls:
1, 6, 2, 4, 1, 1, 3, 1
1, 1, 1, 1, 2, 6, 3, 4
Since these two sequences have exactly the same numbers they obviously have the same shape. However something else about these sequences is different, the order of the numbers within the sequence has changed, they have a different colour.
Sequences of random numbers can be displayed as a simple line graph. Here’s some totally random, uniform distribution, noise:

A simple 1D wave like this could also be though of as an audio signal. Click here to listen to three seconds of the same white noise signal. Now the most important bit, here’s the spectrum analysis which shows what frequencies are in that signal:

The shape of this frequency distribution is the colour - this totally flat distribution is known as White Noise.
So why would we care about the colour of noise? Low frequency signals do not change much from one instant to the next. If a random sequence has a mix of frequencies (such as white noise) sometimes the low frequency component will become the dominant one (purely by chance) causing a run of similarly valued numbers. This is pure randomness but it doesn’t feel random to a person - no doubt you’ve played a board game and been incredulous at someone rolling “too many” sixes in a row. The same problem occurs when rendering with noise. Humans are very good at detecting visual patterns even where they don’t exist. Notice how this texture of uniform white noise looks “clumpy” in places:
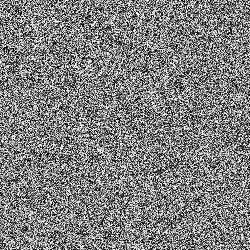
That doesn’t look nice, people will spot those clumps in the final render. We need something seemingly more random than pure randomness! Now that we know about the colour it’s pretty easy to understand what that means - we want to reduce or eliminate the low frequency components.
Here are the frequency plots of some other colours of noise, courtesy of wikipedia. White, Pink, Brown (no, this doesn’t have any special biological effects when listened to), Blue, Violet and grey:


Blue noise seems like it does what we want. Here’s what that looks like:

Back To The Dither
Let’s get back to dithering. Here’s a reminder of the pixel shader we’re trying to dither:
float4 Add_PixelShader(float2 screen_coordinate)
{
  float4 tex1 = SampleTexture(Texture1, screen_coordinate + random_float2());
  float4 tex2 = SampleTexture(Texture2, screen_coordinate + random_float2());
  return tex1 + tex2;
}
Adding two textures together, with dithering on the texture coordinates. We now know that we want to use noise with an approximately bell curve distribution, and we want the noise to be blue noise to reduce clumpiness in the final output image.
First we create a random vector:
float2 random_float2()
{
  // Create a vector 2 from 2 random numbers
  return float2(random_float(), random_float());
}
So now we need 2 random numbers, with a normal distribution (bell curve). We can use the Bates Distribution to get approximately the right shape:
float random_float()
{
  return random_blue() + random_blue();
}
Finally we need a random blue noise value. Generating blue noise is actually quite difficult, it’s probably not something you can do on the GPU in a pixel shader! The best approach to this is to keep a texture of blue noise and to sample from that. Check out this fantastic blog post about generating blue noise, there’s also a huge pack of blue noise textures in a variety of formats and sizes!
This does make things a little more complex. We need some kind of texture coordinate so we know where to sample from the blue noise texture - this is essentially the seed to the random number generator. The best way to do this is to use a single blue noise texture with different noise in each channel, that way you get 4 different independent blue noise values from one single “seed”. Our final random function would therefore look like this:
float2 random_float2(float2 seed)
{
  // Get 4 blue noise values. Make sure this is using point sampling!
  float4 blue = sample(blue_noise_texture, seed);

  // Create 2 random numbers, using the bates distribution to make them triangular
  return float2(
    (blue.r + blue.g) / 2,
    (blue.b + blue.a) / 2
  );
}
Practical note: This is not the best way to create a random vector (although it will suffice for dithering). This will generate a box of samples around the center point but you disk of samples. Maybe I’ll do an article on that in the future. For now just Google “Poisson disk sampling”
Conclusion
I’ve covered the basics of dither in this article. It’s a much more complex topic than I first thought! If you’re interested in the topic make sure to read these other things:
Generating blue noise and free blue noise textures: Moments in Graphics
Colours of noise: Wikipedia
Probability Density Function: Wikipedia
Poisson Disk Sampling: Herman Tulleken - Dev.Mag
A purely monochrome game: Return of the Obra Dinn